Introduction
FracTest is a fractal viewer for 2D, Mandelbrot-like fractals.
It's designed for in-depth fractal exploration, and fractal art.
FracTest was written largely as a software engineering project, and
not to be the "best" Mandelbrot app in any specific way; however, it has some
interesting features:
- ease: FracTest provides drag-and-zoom exploration, and stepping
backwards and forwards in your persistent
browsing history.
- control: FracTest provides comprehensive controls to get the
specific view you want.
- unlimited: FracTest supports arbitrary-precision arithmetic, to
allow zooming to any depth you like; no limits. Tested to 21,818-bit precision.
- resolution: the resolution of the generated image is not dependent on the
window size, but configured separately. Currently images up to 15,360 × 8640
pixels can be rendered and saved. (The app is easily configurable for other
image sizes, but to date this is the highest size supported.)
- colouring: FracTest provides comprehensive
colour controls, to
the point where you can edit all the colours in a palette.
- designed for depth: FracTest can render a simple Mandelbrot view
in just over a second, but is optimised for deeper zooming. It can
handle renders that take weeks. Tested to a depth of 10-6566.
- speed: FracTest renders pretty
quickly. It's faster than
UltraFractal in many cases, and much faster at some resolutions; even
at very deep zooms (10150) it's only twice as slow.
- progressive: a
very general progressive-rendering algorithm lets you see very quickly
(often less than 1% of the render time) what a view is going to look
like
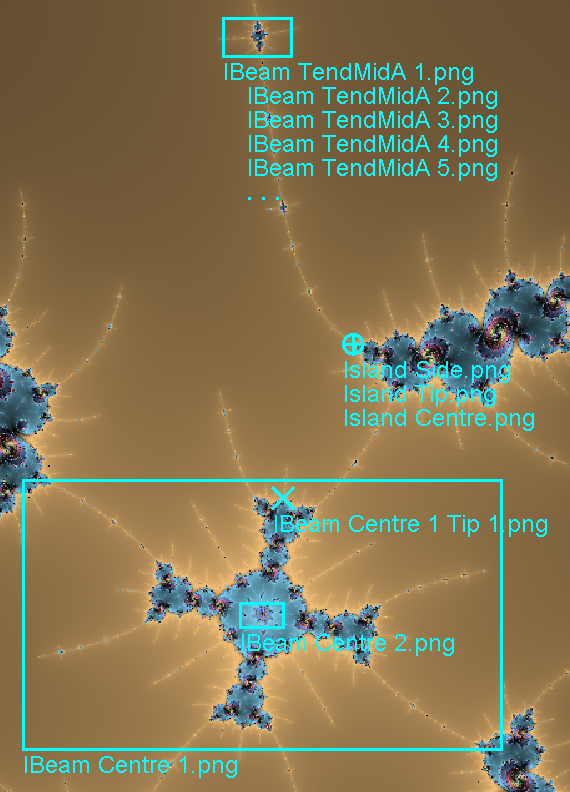
Context overlays in a fractal view
(click to expand).
context: FracTest can index
all of the saved fractal images in your library, show them in a
containment-tree view, and display the outlines of in-sight views
within your current view. This can be very useful when exploring,
to see how views relate to each other.- restartable: a
partially-computed fractal view can be saved in a file, and then later
re-started from where it left off. This happens automatically when
stepping back and forwards in the history.
- checkpointing: the
app regularly saves checkpoints of the current computation, so that in
the event of a failure, it can be re-started from the last checkpoint.
- parallel processing:
FracTest is multi-threaded, and will use all
the available processors in your computer.
- cluster computing: you can
run FracTest servers on multiple computers across a local network, and use
them all in a single fractal computation.
- sessions: multiple sessions
can be in use at once, with their settings, checkpoints, and history
kept separate.
- portable: FracTest is written in 100% pure Java. This means
we can't use optimised hardware features such as SSE instructions; but
it means that FracTest can run on any platform which supports Java SE
8 or later.
- scriptable: FracTest has extensive
command-line options, allowing
for easy automation.
- batch processing: FracTest can
be set up to process a batch of previously
saved view specifications, automatically processing and saving them
all as it goes.
Just to be clear, there are a number of things FracTest does not do:
- perturbationsPerturbation of Mandelbrot set fractal
A thread on Stack Exchange about computing the Mandelbrot set using the perturbations techniuque. (Stack Exchange)
— sorry, but
that's really hard, and doesn't fit well with the way that FracTest is currently
built to do multi-threading.
- fast, "live" fractal zooming —
XaosXaos
An excellent live, real-time fractal zoomer, by Thomas Marsh and Jan Hubicka. (Xaos)
is excellent for that.
- in-depth mathematical fractal analysis — other tools have that
covered.
- 3D, IFSIterated function system
Wikipedia article on iterated function system fractals. (Wikipedia)
fractals — sorry, just
plain old 2D Mandelbrot-like fractals.
This page provides a quick overview of what it takes to get started
with FracTest. However, there is much more detail in the pages
you can find linked from the index at the top of any page.
Quick Start
FracTest is a Java application; as such, you will need Java SE version 8
or later installed to run it. The app is delivered as a single JAR file.
See the installation page for
more details on installing FracTest, and to get the JAR file.
Once you have completed the installation,
double-click the JAR file to run FracTest. The main window will
open, and will look something like this (click to expand):
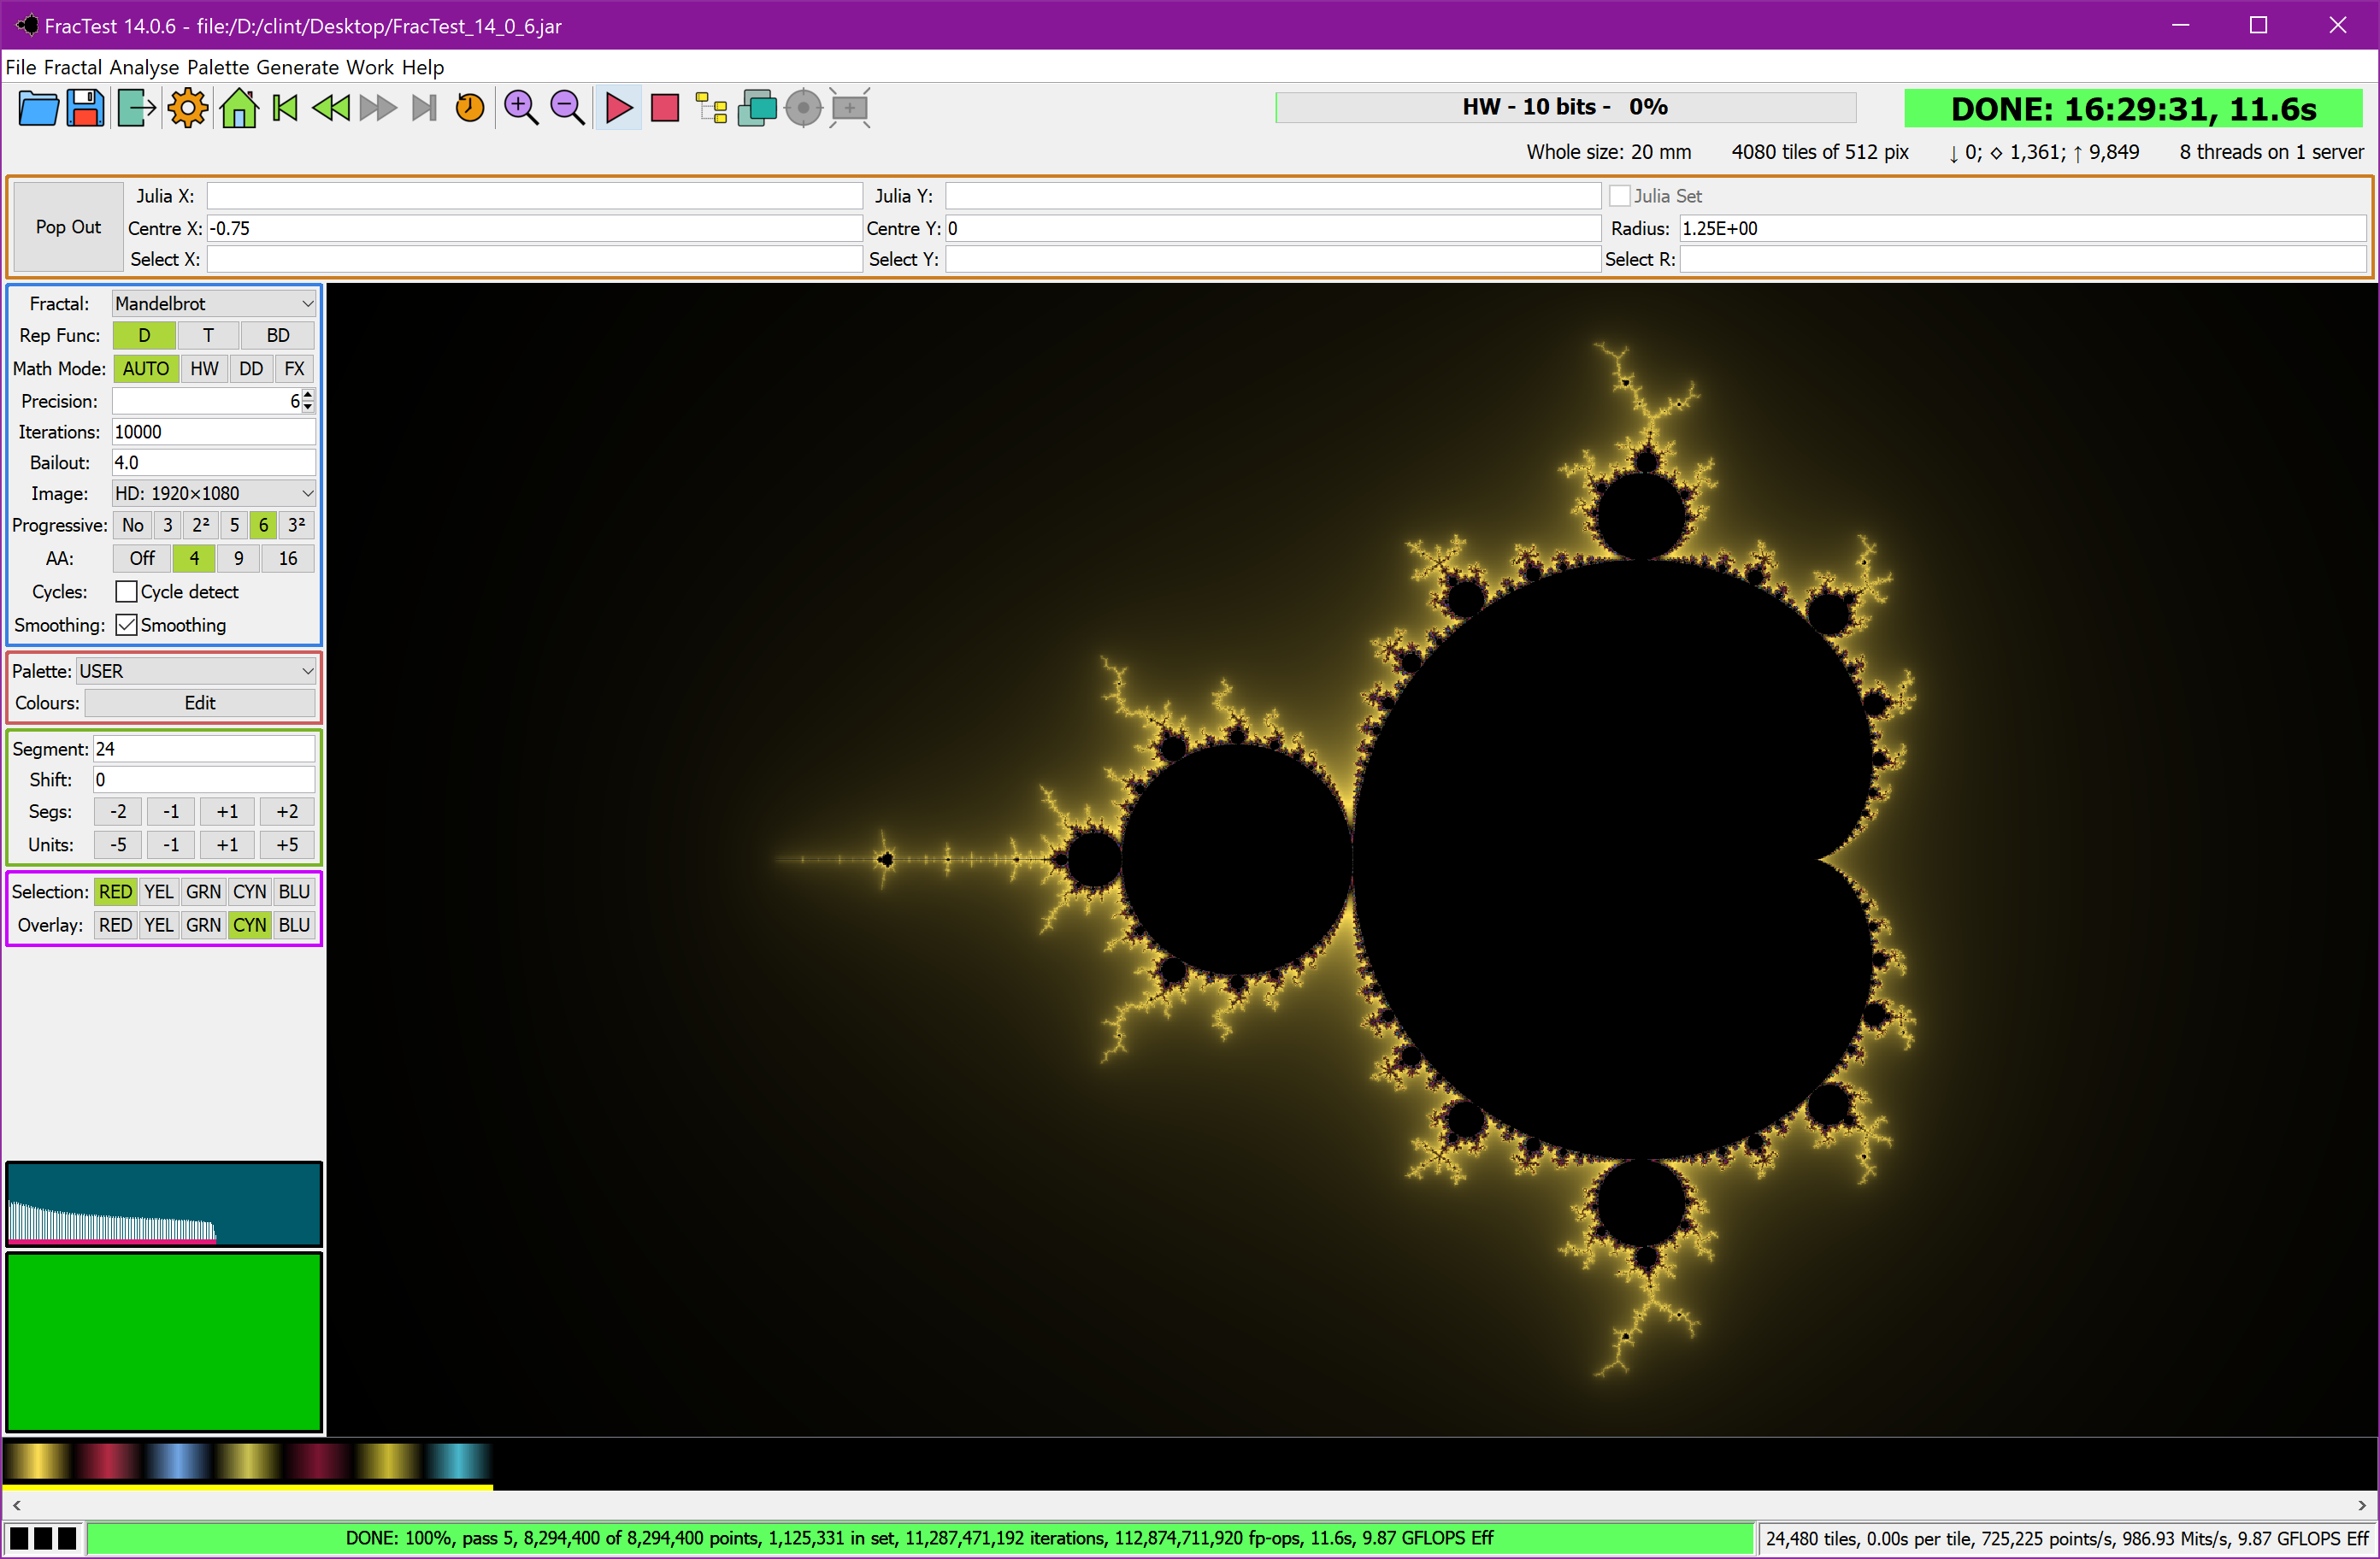
Initial application window (click to expand).
The Window
As you can see, the window has a number of sections:
- The window frame displays the software name and
version
- Below this is the menu bar, which provides a
list of the functions available
- Then there is the toolbar, which has control
buttons for the main functions. To the right of this are various items
of information about the current view
- Under the toolbar is the co-ordinate panel,
where the co-ordinates of the current view can be seen and edited; a
“Pop Out” button on the left allows this to be popped out to a larger
window, which is handy when the co-ordinates are very long
- Below this to the right is the main part of the app: the fractal display
window, which shows the current fractal; this updates as the fractal is
generated. It also allows you to select an area with mouse, for example
to zoom in
- On the left are the detail controls: the control
panel for the view generation; the palette controls; and the palette
application controls.
- Below the controls are a histogram, and a status
view showing the rendering process for each part of the image.
- Second from the screen bottom is the current
palette.
- At the very bottom is the status area, showing
computation status and performance statistics.
The main controls are:

|
"Play": render the current view parameters; if you have made a selection,
the selected area will be rendered. |

|
Stop: stop the current render. |

|
First: go back to the first view. |

|
Previous: go back to the previous view. |

|
Next: go forward to the next view. |

|
Last: go forward to the last view. |
Using It
The fractal window will show a default view of the Mandelbrot set
initially. To zoom in, click and drag in the fractal view to
create a selection; move it around with the mouse if needed; and click
the "Play" button to render the selected area.
In the main window you will see the fractal being
rendered. By default, the fractal is rendered
progressively, with the first pass creating a rough view, and
subsequent passes filling in more details.
As the fractal renders, you will see boxes drawn
over it. These are the tiles into
which the image is divided, with
each tile being calculated as a unit. With multiple processors,
potentially including network servers, tiles are farmed out to
processors as they become ready for work, so that all of the
available processors are kept working all the time until the
computation is finished.
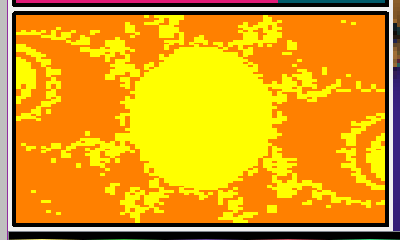
Near the bottom-left of the main window you will see the progress window.
This is a map of the fractal, showing the rendering states of all the
tiles. Each tile is colour-coded to show its state, with various
colours used to show how many passes of progressive rendering have
been completed for each tile; the number of passes can be set from 1
to 6. Black indicates that the tile hasn't started yet; subsequent
passes are coloured grey, brown, red, orange, yellow, and green, with
green always being the last pass – i.e. the tile is complete. In
the example at right, the third-last (orange) pass is complete, with
many tiles also having been rendered at the second-last (yellow)
pass. If progressive rendering is turned off, tiles will go straight
to green.
In the first pass, we calibrate roughly how much
work is needed for each tile; in later passes, tiles are rendered
from the slowest to the fastest. Hence the progress window becomes an
approximate map of where the most intense parts of a fractal are, as
can be seen in the example here.
During rendering the progress bar at the bottom of
the window will indicate progress. Its colour also indicates the
overall application state; blue is rendering, green means complete,
and purple means aborted (i.e. you pressed stop). Text in the
progress bar shows various statistics about the computation.
Loading and Saving a Fractal
The toolbar also contains the file load and save controls:

|
Open a PNG file which was previously saved by FracTest. |

|
Save the current view to a PNG file; the view parameters and computation
state are saved as meta-data. |

|
Export the current view to a Jpeg file; the view parameters are not saved. |
The main format for saving fractals is the
PNG format. This is a
lossless-compressed format, which means it saves the image exactly, with no loss
of quality, so it's great for use as the master copy of a fractal image.
More importantly, when you save a PNG, FracTest
saves all of the fractal parameters in the meta-data of the file. This means
that quite apart from viewing the file, you can re-open it in FracTest and
then adjust the view to continue exploring from
where you left off. This is what the “Open” button does – it
loads the fractal parameters (not the image) from a PNG file, then
re-renders the fractal based on those parameters. If the file has a saved
computation state, then FracTest can
re-start the computation from
where it left off.
So this is how you save a fractal view – not
just its image, but all the parameters needed to re-create it. Click
the “Save” button, save as a PNG file, and everything you need is
in that file.
You don't have to wait for a fractal to finish
rendering before saving it; just click stop, and save what you have.
The image may be rough or incomplete, but the parameters will all be
there, so you can re-load it and finish rendering it at your leisure
(possibly using batch mode, which will be explained later). Since
FracTest stores the current computation state in a PNG file, it will
even pick up where it left off when you re-open the file, saving you
from re-computing the pixels already computed.
PNG is a great format for completely precise storage of an image; but it can
be quite slow. Some apps, like web sites, slideshow viewers, etc., can struggle
with it. The JPEG format is a lossy-compressed format which is very efficient
and widely supported. You can create a JPEG copy of your image with the
“Export” button. Note that JPEG images do not contain the fractal
parameters, so you always want to keep the master copies of your
fractals in PNG format.
More
Having got started with FracTest, there is plenty more information
available here:
- Concepts: a discussion of
various foundational concepts in FracTest. You can read through
this, or just skip it; it will be linked to from relevant places.
- Sessions: how to use
sessions to manage multiple simultaneous instances of FracTest.
- Usage: a more complete guide to
using FracTest in its normal interactive mode.
- Settings: how to use
FracTest's application settings.
- Files: how FracTest uses files
to store more than just images.
- Palettes: a guide to
colouring and palettes in FracTest.
- History and Checkpoints: how
the history navigation and checkpointing features work.
- Context: how FracTest can
display contextual images from your fractal library as you explore.
- Command Line: a complete
description of all the command-line options supported by FracTest.
- Batch Mode: a complete guide to
FracTest's batch processing mode.
- Cluster: a guide to cluster
computing with FracTest, which allows you to utilise multiple computers
for a single computation.