When exploring the Mandelbrot set, it is natural to keep a library of
interesting views which you have discovered — whether for artistic value,
or to investigate how forms within the set change as you zoom in, or
both. The inter-relationships between these views can be very
interesting; see, for example, various online discussions about
Julia morphingJulia Morphing
A thread on Fractal Forums about Julia Morphing. (Fractal Forums)
https://fractalforums.org/fractal-mathematics-and-new-theories/28/towards-a-language-for-julia-morphing/493.
FracTest can help you to visualise the relationships between views stored in your libraries. This page will tell you how.
To get FracTest to manage your context, you first have to configure your fractal library, or libraries, in it.
First, in the settings, add the names of your fractal library folders in the "Context Dirs" setting.
In each FracTest session, when you open the context window (see below) for the first time, these directories will be scanned for fractal views, which are loaded into the context database. This organises the views according to their containment hierarchy.
While running FracTest, you can opt to have views which are in the context database, and which lie within the current view, displayed as overlays on top of the view.
Once the database has been indexed, any views added to, or removed from, your configured fractal library folders, are automatically updated in the context database. As you navigate the fractal, the current view is automatically added to the database each time it changes.
Note that FracTest can only index Mandelbrot set views, and not the associated Julia sets. We do not recommend adding your history or checkpoint folders to the "Context Dirs" setting, as this will produce unpredictably changing results.
To avoid unnecessary overhead in the event that you aren't using context, FracTest builds the context database the first time the context window is opened (as described below). This process can take several seconds.
The window appears as follows:

The tree hierachy represents the containment hierarchy of the indexed views. Double-clicking a view will open it in the main window.
When overlays are enabled, all views which lie within the currently-displayed view will be displayed in the main window. The following picture shows a typical set of overlays:

The picture on the right shows another example of context overlays in detail (click to expand).
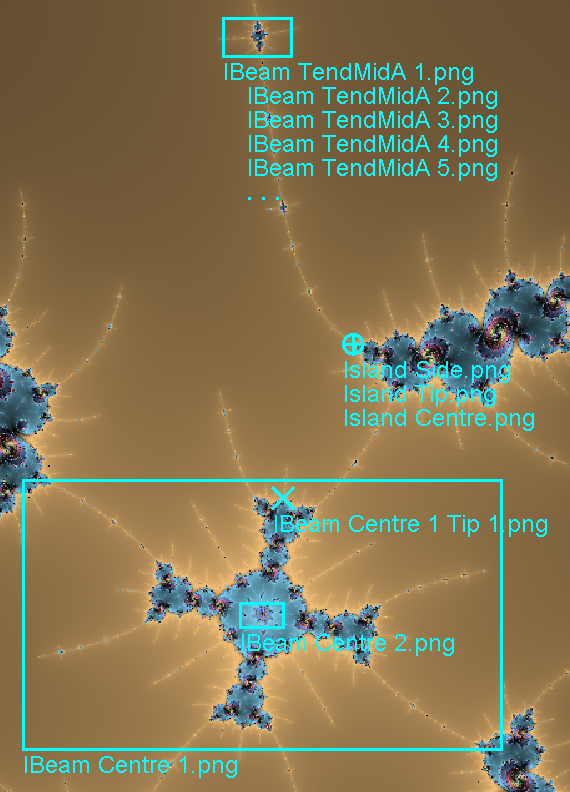
IBeam Centre 2" is contained
within "IBeam Centre 1".
Views which are too small to display as rectangles are displayed as
diagonal crosses. This is the case here, for example, with "IBeam
Centre 1 Tip 1", which is also within "IBeam Centre 1".
If a view contains nested views which are too small to display,
those views' names are shown indented below the name of the top-level
view, up to a limited number of views. At the top of the picture,
for example, you can see that "IBeam TendMidA 1" has nested
views listed below it. The ". . ." at the end indicates
that there are more views, whose names are not shown.
When multiple views are too close together to show separately, but
not contained within each other, they are merged into a single symbol
shown as a vertical cross within a circle. This is illustrated by
the three side-by-side views "Island Side", "Island
Tip", and "Island Centre" in the image. The
names of the nested views, up to a limit, are shown beneath the symbol.
Double-clicking in an overlay rectangle, or on a cross symbol, will open the associated view — if there are nested views, the top-level view will be opened. Since the "merge" overlay doesn't have a top-level view — it represents several side-by-side views — double-clicking it has no effect. Zoom in to see the individual views separately.