The main thing about any eclipse is to
get out and see it, so here's some information on the best ways to do
that. Particularly in a brief total solar eclipse, you may well decide
to just relax and enjoy the event, leaving photography to the experts;
but if you'd like to have a go, there's some information on eclipse
photography here too.
Careless observing of a solar eclipse can cause permanent eye damage;
so be sure to read about eclipse eye safety.
Solar Eclipses
Location, Location, Location...
If you're going to see a solar eclipse,
the first thing to do is find a good place to see it from. For a
partial solar eclipse, which
is visible over a large part of the Earth, this should be easy;
but more care is required if you want to get the best from a
total, annular or hybrid solar eclipse.
You will see from the maps of total solar eclipses that the path of totality is quite
narrow; if you're not in this zone, you'll miss the total eclipse entirely,
and only see a much less interesting partial eclipse. You want to be fairly
close to the centre of this path to see a decently long eclipse —
you don't have to be right on the centreline, as the duration of
the eclipse falls off quite slowly at first as you move away from
the centre; closer to the edge, however, it drops much more rapidly.
As a rule of thumb, if you are in the middle third of the path you will
see a total eclipse within about 90% of the duration on the centreline.
Of course, a clear sky is essential, so try to get to a place with
the least chance of cloud. Study the weather reports, and
try to find a place with the best chance of clear skies.
Finally, and this may sound obvious, pick a place with a good view
of the sky where the Sun will be during the eclipse. Go there the
previous day at the same time to see where the Sun will be, or work it
out with a compass. If you're going to set up a solar projector
(see below), a practice viewing the day before will help you to
figure out the best setup. (And you might see Sunspots!)
One tip — stay away from streetlights! Automatic streetlights
may come on right at the moment of totality, which will spoil everything
if you're under them.
So, once you're in place, what's the best way to view the eclipse
safely?
Direct Viewing
To look at the Sun directly, you need eye protection; otherwise you
risk permanent eye damage. Sunglasses are
nowhere near good enough; properly designed solar filters (such as eclipse
viewing glasses), made and certified to appropriate national safety
standards, are needed to view the Sun in any partial or annular eclipse,
and the partial phases of a total eclipse. See the
eclipse eye safety page for more
information.
Ad-hoc methods such as welder's goggles are not safe unless you know exactly
what you're doing; you're probably better off just getting purpose-designed
eclipse glasses. But with fake goods of all kinds flooding the market these
days, make sure you get your eclipse glasses from a reputable source.
The total phase of a solar eclipse —
when the Sun is completely covered by the Moon
— can and should be viewed without any filters. The naked eye view of
totality is safe and is the most awe-inspiring astronomical phenomenon you are
likely to see. Just remember to look away and put your eclipse glasses
back on as soon as the Sun returns.
Never attempt to look
at the Sun through a
telescope, camera, binoculars, or any other optical aid!
Pinhole Camera
The most recommended safe methods for viewing the Sun have one thing in
common: they involve projecting the Sun's light onto some surface, so
that the Sun is viewed indirectly. Be careful when setting
these types of experiment up; the temptation to look through the setup
to get it lined up must be resisted! The golden rule is that your
back should be towards the Sun at all times.
The simplest method is a pinhole camera. Make a small hole in a
sheet of card, and hold it about a metre from another sheet of card,
with your back to the Sun; the Sun's light will be "projected" through
the pinhole and form an inverted image on the second sheet of card,
which you can then look at safely. Don't look through the pinhole!
You can adjust the size of the image by adjusting the separation of
the cards.
Unfortunately, the image projected will be very small;
just over 9mm for every metre of distance between the pinhole and the
screen. You can improve on this by putting the screen a long way back
from the pinhole, but you'll need to have lots of shade around the
screen for the faint image to be visible. One idea is to put the pinhole
in the window of a dark room, surrounded by curtains, or to use a tent.
Making the pinhole bigger won't help — it will just
make the image blurrier. A small pinhole will give you a sharper image,
albeit dimmer.

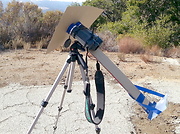
A simple binocular-based eclipse
projector.
Solar Projector
A better technique is to project an image of the Sun using a telescope,
or one side of a pair of binoculars. Place a sheet of cardboard
around the objective (the big end) of the telescope or binoculars,
to act as a shade for a second sheet positioned behind the eyepiece,
about a foot or more away. The danger of this method is the temptation to peek
through the telescope — you must not do
this, even for a moment, or you will risk serious permanent eye damage!

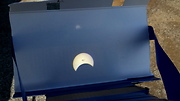
The
partial Solar Eclipse of 23 Oct, 2014, viewed with this projector.
Setting this up can be a little fiddly, especially as the Sun is moving.
In fact, you will discover that the Sun actually moves quite quickly across
the sky — it will move its own diameter in about 2 minutes. Having a
telescope or binoculars on a tripod, with a sunshade and screen directly
attached, should
help. The whole thing should be adjusted by trial and error; you can adjust
the focus by means of the focusing knob, and by moving the screen. Bear in
mind that the projected image will be inverted — i.e. upside-down and
left-to-right.

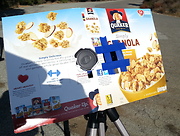
The shade in front
of the projector; part of the lens is blocked to dim the image.
The projected image may be too bright for comfortable viewing or
photography; if so, you can dim it with some
tinted plastic, or an ND filter, in front of the telescope; or just block
out part of the lens with a piece of card with a hole in it, or even just
a square of tape as shown here.
Remember that you can experiment with the projection
technique on any sunny day — and this is a good way to look for
sunspots! In fact, you should certainly build and try out your Sun
projector in advance of an eclipse, to fine-tune it.
The projector shown here was used to capture the image, shown above, of the
partial Solar Eclipse of 23 Oct, 2014,
and the huge sunspot region AR 2192Giant Sunspot Region 2192
An article on the huge active region 2192 on the Sun, in October 2014. (Space Weather Live)
.
Trees
If you are under trees when the eclipse is happening, you'll have a good
chance to see images of the crescent Sun on the ground beneath them. This
is because the gaps between the leaves act like pinhole cameras
to project images of the Sun on to the ground. If the trees are tall enough,
these images can be quite large.
Totality
Finally, the Sun during totality is a beautiful and spectacular
sight; but don't be caught out by the end of the total period! Find
out how long the total eclipse is going to be where you are,
bearing in mind that a difference of a few miles can make a huge
difference, and be prepared to look away and put solar viewing glasses
back on at the first signs of the returning Sun.
Lunar Eclipses
Viewing lunar eclipses is easy and completely safe. The Sun is
safely below the horizon; above you
in the night sky hangs the Full Moon, slowly being stained a dark red
colour by the encroaching shadow of the Earth... Gaze and enjoy! (In
case you're wondering, the Full Moon is about 400,000 times
dimmer than the Sun.)
It's worth thinking about your location. A lunar eclipse is visible
over half the world, so as long as you're in that half, you should see it;
but make sure you have a clear view of where the Moon will be during
the eclipse. If it happens in
the evening, just after sunset, the Moon will be rising in the east; if
it happens just before dawn, the Moon will be setting in the west.
If it happens in the middle of the night, the Moon will be high in the
sky, so the view shouldn't be a problem.
As with any eclipse, the main thing you need is a clear sky, so if
possible look for a location with a lower chance of clouds.
Any night-time astronomy
is greatly enhanced if you can get away from all the light pollution and
smog in towns, so getting out into the country is a good idea; but having
said that, a lunar eclipse should be easy to see from any back garden.
With the eclipse being visible from the entire night side of the Earth,
all you need is a clear sky.
No special equipment is needed; a lunar eclipse is great for naked-eye
viewing. Dress for the night temperatures and take a flask of something
warm. The biggest danger is tripping over something in the dark, so
watch your step!
Binoculars can help you to see the full beauty of the Moon, and can
reveal a fascinating view of the lunar craters — try looking at craters
around the edge of the Full Moon. Though, in fact, looking at the Moon
when it's half full is even better; the craters stand up in dramatic
relief with the Sunlight slanting across the lunar landscape.
Photography
Eclipse photography is a slightly tricky business, at least until
someone has figured it out for you — since other people have written
about this far better than I can, I'll just point you to some resources.
Bear in mind that pointing a camera at the Sun for any length of time,
without proper protection, will generally ruin the camera very quickly.
Of course this is not as bad as damaging your eyes, but it can get very
expensive. To keep your gear safe, proper solar filters must be used,
just as for naked-eye viewing.
The links below provide useful information on photographing and
videoing an eclipse, including shutter speeds, filters, and so on.
Eclipse Viewing Links
Eclipse Safety
- Eye Safety During Solar Eclipses, by Fred Espenak (NASA Goddard Space flight Center)
- An essential guide to safety while viewing a solar eclipse, from the experts at NASA.
- Eye Safety During Solar Eclipses, by B. Ralph Chou (NASA Goddard Space flight Center)
- A more detailed look at the safety issues in observing solar eclipses, by B. Ralph Chou, Professor Emeritus in Optometry and Vision Science at the University of Waterloo.
- B. Ralph Chou, Professor Emeritus (University of Waterloo)
- A profile of Professor Ralph Chou, with links to his writings on eye safety with respect to optical radiation.
- Solar Eclipses and Public Education, by Professor Jay M. Pasachoff (Williams College-Hopkins Observatory)
- An interesting article on the difficulties of properly communicating the dangers of eclipses, by Professor Jay M. Pasachoff, Field Memorial Professor of Astronomy at Williams College, MA.
- OK, Look Directly at a Total Solar Eclipse, by Dick Land (Williams College-Hopkins Observatory)
- A discussion on safety in solar eclipse viewing, by Dick Land of The Schepens Eye Research Institute.
- Special report: Let your kids see the eclipse! (Phil Plait (SyFyWire))
- An article by professional astronomer and science communicator Phil Plait, making the case that children can and should be allowed to safely view a solar eclipse.
- How to Tell If Your Eclipse Glasses or Handheld Solar Viewers Are Safe (American Astronomical Society)
- A useful article on obtaining and identifying safe-to-use eclipse glasses.
Eclipse Observing
- Eclipse Photography (NASA Goddard Space flight Center)
- A major list of eclipse photography resources.
- How to Look At The Sun (Sky and Telescope)
- Information page on observing the Sun, including great information on observing eclipses safely.
- How to Photograph a Lunar Eclipse (MrEclipse.com)
- Fred Espenak's guide to lunar eclipse photography.
- Climatology and Maps for the Eclipse Chaser (Eclipsophile)
- Eclipse meteorologist Jay Anderson's page of weather prospects for eclipses and other astronomical phenomena.
